
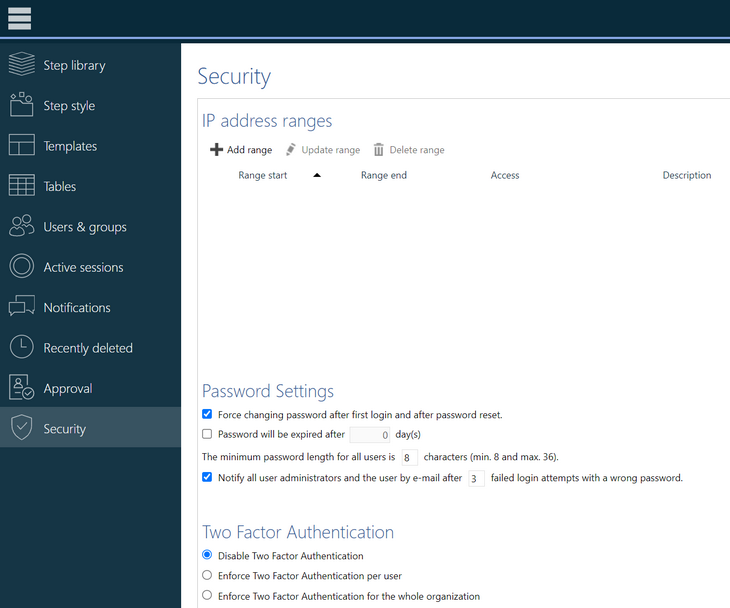
If you are in the Users Manager role you are allowed to manage security settings in your organization. First, open the Engage Process Admin Center tool by pressing the application launcher button ![]() on the top-right of the window and then select Admin Center (you can login directly to it using the link https://admincenter.engageprocess.com). Select the Security tab there.
on the top-right of the window and then select Admin Center (you can login directly to it using the link https://admincenter.engageprocess.com). Select the Security tab there.
IP range
Initially, the users of your organization can access the Engage Process tools from any IP address. You can limit this by specifying one or more ranges. Press the Add range button to specify a new range.
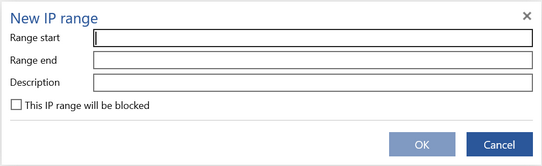
Type the start and the end IP addresses of the range and press OK. Only logins from IP addresses within this range will be allowed.
If you check the This IP range will be blocked box then the logins from IP addresses within this range will be not allowed and logins from outside this range will be allowed.
If you have both blocked and not blocked ranges then blocking overrules not blocking.
Press the Update range button to modify the selected range and the Delete Range button to delete it.
Password restrictions
You can decide how often the users of your organization will be forced to change their passwords. By default, the user is forced to change every new password that was defined for him by the user manager. You can relax this rule by checking off the Force changing password after first login and after password reset box.
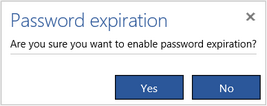
You can also force the users to change password periodically. Check the Password will be expired after .. day(s) box. Since this setting will have impact on all users you will be asked for confirmation:
Then, type the number of days after which the Password will be expired so the users will be forced to change their passwords.
You can also decide here on The minimum password length for all users. This length will be taken into account for all new passwords.
If you want your organization to be notified on attempts to crack the user passwords check the Notify all user administrators and the user by e-mail after n failed login attempts with a wrong password box and fill the required number of attempts. If you do this then, after the specified number of attempts to login with a wrong password, both the user who's username was used and all user managers in the organization will be notified about this incident by an email.
You can also switch on Two Factor Authentication here.
Two Factor Authentication
Engage Process offers Two Factor Authentication for the user passwords. Two Factor Authentication is an extra step during login for each user. He or she will no longer have access with only username and password, but each user will also be required to enter an extra code that is presented in the Authenticator app that they need to install on their phone. Note that the configuration of the Authenticator app only has to be done once and that entering a code can (optionally) be skipped on browsers/devices where the user already entered this during a previous login.
Also note that we only allow two factor authentication using Authenticator Apps. This is the safest method. Other common methods like allowing e-mail login confirmation and even SMS text messages have proven to be sensitive to hacking.
By default two factor authentication is switched off.
You can either enforce it for the whole organization or for particular users.
If you select Enforce Two factor Authentication for the whole organization you will be asked for confirmation because this change will have a big impact on all users:
 .
.
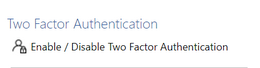
If you select Enforce Two factor Authentication per user and then you open the Users & groups tab you will notice that there is an extra column Two Factor Authentication Status added to the users/groups overview. By default all users will have status Disabled.
Select one or more users and press the Enable/Disable Two Factor Authentication button on the right.
The following dialog appears:
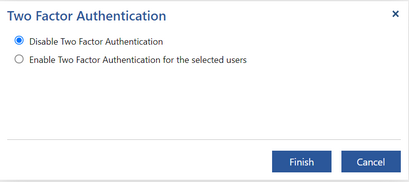
Depending on the status of the selected users one or none of the radio buttons will be selected. Press the one corresponding to the status you want to apply to all selected users and press OK.
If you decide to enable Two Factor Authentication for the users you will be asked for confirmation:

Notice that if you disable Two Factor Authentication then the user's statuses are not cleared. So, if you enable it again the old settings will apply.
Single Sign On
Using the Security tab you can also set up your organization as a Single Sign On (SSO) organization. Contact us to enable this and ask for a separate document that describes how to do this.
The Password Settings part is only available if your organization is not set up as SSO.