
How can I change the language in the Modeler?
You can access the Engage Process Modeler options by selecting the File tab and then pressing Options.
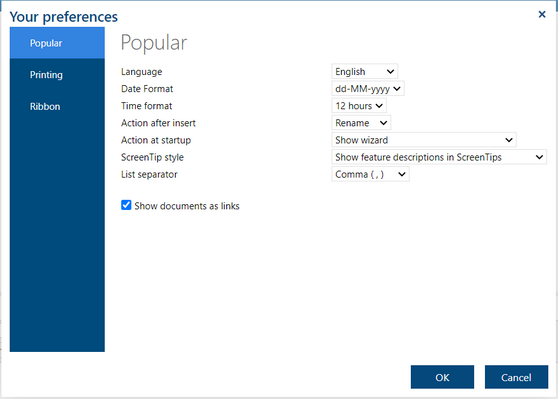
In order to change the application language select it in a Language in the Popular tab. Currently only two languages are supported: Dutch and English. Changing a language requires refreshing of the user interface. The tool will ask you if this should be done immediately.
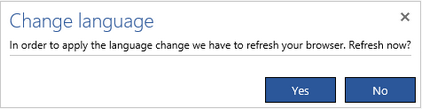
You can answer No and continue working with the old language. Next time you refresh or reopen the tool the language will be changed.
How do I change the date and time format in the Modeler?
You can access the Engage Process Modeler options by selecting the File tab and then pressing Options.
Currently, you can select one of two standard date formats:
![]()
and one of two standard time formats:
![]()
The selected date format will be used in all Engage Process tools.
How do I change the automatic option to rename a newly inserted process step?
You can access the Engage Process Modeler options by selecting the File tab and then pressing Options.
Action after insert defines what happens when you insert a new step into the process diagram. Two options are possible: No action and Rename. In the latter one, the Mini property editor for the newly inserted step will be shown with the focus on its name. You can immediately start typing to enter a step name. This can be useful because usually you will want to enter your own name of a step in place of the standard one generated by the tool.
How can I change what happens when I open Engage Process?
You can access the Engage Process Modeler options by selecting the File tab and then pressing Options.
Action at startup defines what happens when you open the tool. Two option are possible: Show wizard or Open last opened project and diagrams.
In the first one, the startup wizard will be shown. In the second one, the Engage Process Modeler will automatically load the last opened project and then it will open all diagrams that were opened at the moment the user was closing the tool.
Can I change my ScreenTip style?
You can access the Engage Process Modeler options by selecting the File tab and then pressing Options.
A tip appears with an explanation if you move a mouse on top of:
- a button
- a property in the properties pane
- a measure in the Select measures dialogue
By selecting the screen tip style you can decide whether
- the full description should appear
- only the name of the function/property appears
- the tip should not be shown at all

Can I change the list separator seen in my exported CSV files?
You can access the Engage Process Modeler options by selecting the File tab and then pressing Options.
![]()
You can decide what list separator, comma or semicolon, will be used in all CSV files that you export from Engage Process tools.
How do I change the documents hyperlinks settings?
You can access the Engage Process Modeler options by selecting the File tab and then pressing Preferences.
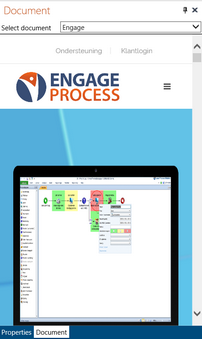
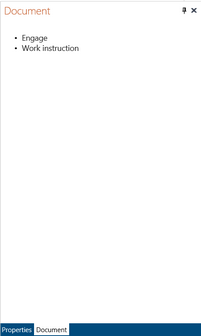
Every process step has the Documents property defining a set of documents linked to it. The content of one of these documents is shown in the Document pane. If there are more than one document linked you have to select it in the combo box on top.
If Show documents as hyperlinks box is checked then instead of the content of a document, a list of hyperlinks to the linked documents will be shown in the Documents pane. If you click one of those links the document will be shown in a new browser window.
This option is especially useful if you want to link to documents or websites that can only be opened in their own window.
How do I change the printing settings?
Click on the File tab, press the Options button and select the Printing page in the dialog that appears.
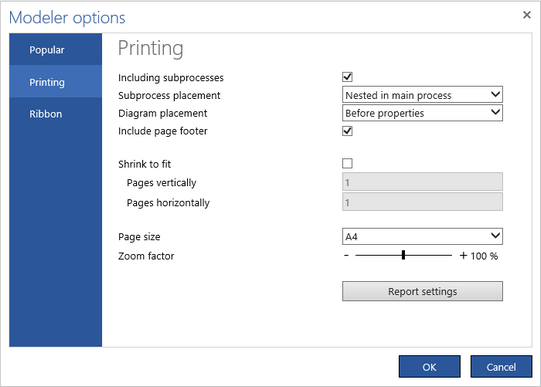
A PDF or MS Word file with a process can be prepared for printing in two ways: as a process diagram and as a list of process steps with their properties (report). You can influence some aspect of this preparation by setting some default options. All these options can be later overruled by Printing and Reporting for each particular process.
Check Including subprocesses box if you want to print information (diagram, report) about all subprocesses recursively.
By selecting Subprocess placement you decide where information about subprocesses should be placed: either each subprocess On separate page or Nested in main process.
By selecting Diagram placement you can decide if the diagram should be added to your report After properties, Before properties or not at all (None).
Check Include page footer box if you want to add a page footer to each page that contains a diagram.
The process diagram is prepared as one big image cut into pieces if it does not fit to one page. The area that is available on one page for a process diagram depends on the margins sizes and the included page footer. Usually that area does not contain an integer number of process steps (neither horizontally nor vertically) so to prevent the page border to cross a process step icon the margins are made even bigger than specified.
Check Shrink to fit to ensure that the diagram will be printed on the desired number of horizontal and vertical pages (these numbers are defined in Pages horizontally and Pages vertically, respectively).
Take into account that if the Zoom factor is small the diagram is shrunk to such extend that the texts on the picture becomes difficult to read.
You can select the default Page Size for the PDF or MS Word files with diagrams and reports. The actual page size while printing depends on the printer settings.
Press Report Settings button to open a wizard where you can specify how the default report should look like.
Can I change the standard Report settings wizard?
Here's how you can change the default settings in the Print/Report menu via the wizard
You can access the Engage Process Modeler options by selecting the File tab and then pressing Preferences. Go to Printing. The settings selected here will be used as default values in all reports available in the Print/Report menu.

You can use the first page of the wizard to select step types that will be included in the report. Initially Start/Entry, Stop/Exit and all activities are selected. Select the step types to be reported in the process report. Then, press Next.

Select the process and process step Properties you want to be reported in the process report. You can also select process Statistics there if you want to include them in the report.
You can decide on the order the properties will appear in the report. Put your cursor over the drag handle (six dots) on the right hand side of the property name and drag it up or down to the required position. You can only reorder properties within one category but you can also reorder the whole categories. Type, Number and Tag properties cannot be reordered since they compose the header for the process step together with the Name. Sub-properties (like Processing time per custom type) cannot be reordered either.
Press the Next button to continue with the wizard.

Choose the Report layout for the generated report. In the Tables layout, all the properties will be put into one big table. If the Standard layout is select then the resulting report uses pictograms to mark properties or groups of properties (see the example below).
Check Creation dateto put the today's date on the cover page
Check Process owner information to put the content of the Process Owner property of the process on the cover page.
Check Process manager information to put the content of the Process manager property of the process on the cover page.
Check the Show only process and subprocesses in Table of Content if you want to simplify the table of content (otherwise all process steps will be also in the Table of content).
Select the required Header- and Content Font and Size.
Press Finish to close the Report settings wizard.
How do I change what icons are included in the "Ribbon"?
Here you can change the order in which the intuitive icons are visible
In order to customize the icon order in the Insert Steps group of the Home tab click the File tab, press Options, and select the Ribbon page in the dialog that appears.
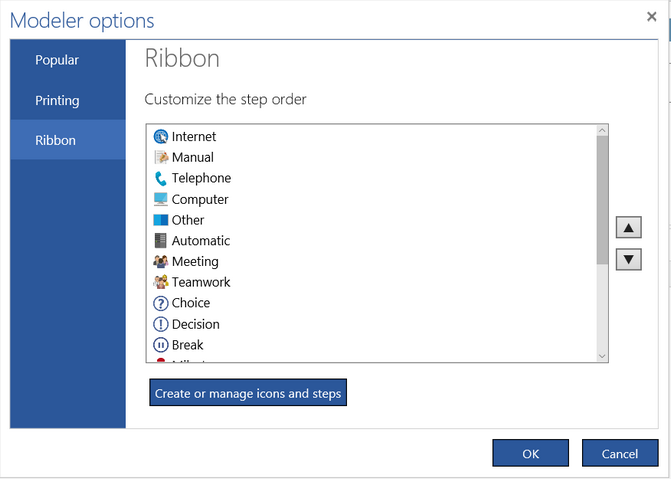
Select an icon or a set of icons that you want to move and use buttons on the right hand side to move it up or down.
Press OK to apply the changes.
Press the Create or manage icons and steps button to access the step type settings (this button is not available in the Engage Process Modeler Starter edition).