You can insert a process step in front of a selected one and you can delete a process step. Since a process diagram is actually a tree of process steps with extra links, you can delete a subtree, add a branch and delete a branch. You can also cut/copy and paste a process step or the whole subtree. By creating a goto step you can make a connection between an end of a branch and another process step. By dragging and dropping a process step you move a process step or you move a subtree to another location.
You can also select many process steps at once. This multiple selection can be then copied, moved, cut or deleted. You can also extract the multiple selection and make a subprocess out of it.
How do I insert a process step?
Select a process step in the Diagram pane. Click the button corresponding to a process step type that you want to insert in the Insert group on the Home tab. Engage Process Modeler will automatically insert the process step in front of the process step that is currently selected. However, if a Start or Entry step is selected the new step will be inserted after this step.
You cannot insert a step in front of Start or Entry.

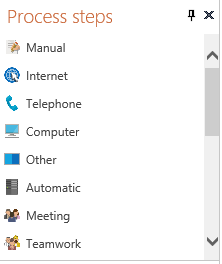
There are many process step types that you can insert into the diagram. It may happen that not all of them are directly visible in the Ribbon. Click the small arrow down button ![]() on the right hand side to see the next portion of the buttons (click the arrow up
on the right hand side to see the next portion of the buttons (click the arrow up ![]() to see the previous one). Click the small go to end button
to see the previous one). Click the small go to end button ![]() to unfold the whole set of buttons.
to unfold the whole set of buttons.

You can adjust the order of these buttons by clicking the in Engage Process Modeler options. Here, you can move the most frequently used icons to the top of the list.
You can also click a small arrow ![]() at the bottom right corner of the Insert steps group to open the Process steps pane containing the same list of buttons but in a more compact way. The same pane can be opened by selecting it in the Show window list of the Workspace group of the View tab (see Showing hidden panes).
at the bottom right corner of the Insert steps group to open the Process steps pane containing the same list of buttons but in a more compact way. The same pane can be opened by selecting it in the Show window list of the Workspace group of the View tab (see Showing hidden panes).
Alternative:
| ► | Right mouse click a process step in the diagram pane. Pop-up menu will appear. Select Insert and then select the type of a process step you want to insert. |
Inserting of an activity in a swim lane view will automatically set the value of the corresponding property (see Insert in swim lane view).
To create a Go to step you can click it in the Insert list. This operation, however, does not insert any new step but it results in changing the selected step into the Go to step. So, the step of the proper type must be selected on the diagram at that moment.
You can also use keyboard shortcuts to insert some of the most common step types.
How do I delete a process step?
To delete a process step just select it in the Diagram pane and press the ![]() button in the Actions group on the Home tab.
button in the Actions group on the Home tab.
Alternatives :
| ► | Right mouse click on one of the process steps. A pop-up menu will appear. Select Delete. |
| ► | Select the step and press the <Del> key. |
You can delete neither Start, Entry nor Sink steps. However, you can delete the Start representing an entry point.
Deleting of a Parallel with an associated Join results in deletion of the Join step as well.
Deleting of a Begin of expanded subprocess (service, phase) results in deletion of the whole expanded subprocess (service, phase).
Deletion a Go to step converts it back into Stop, Sink or Exit step. Deletion of a Go to step inside an expanded sub-process or service transforms this step into the End of expanded subprocess (service, phase).
Deletion of an Exit step or an End of expanded subprocess (service, phase) step converts it into Stop step. Thus, you can delete neither the last Exit step in the diagram nor the main End of expanded subprocess step (the one that connects to the expanded subprocess to the rest of the diagram)
If a step is a destination of an entry point step or an entry point branch then it cannot be deleted (first the entry point step or branch must be removed or redirected to another step). As a consequence you cannot delete any subprocess that contains a step being a destination of an entry point neither any choice/decision with a branch containing such a step.
What are the different specified icons for?
A process consists of a set of process steps that can be divided into three groups depending on the function they have within the process:
- Activities
- Non-Activities
- Navigation (Flow control)
Each of these steps have its own set of properties depending on the step type.
You can use only the standard set of steps types in Engage Process Modeler Starter edition. In the other editions, you can extend or limit this set using step type settings.
The following types of activities are available in the standard icon set:
|
Process Step |
Description |
|
|---|---|---|
|
|
Manual |
A manually executed activity. |
|
|
Telephone |
A manual activity in which a telephone is used. |
|
|
Computer |
An activity that requires the combination of human input and the use of a computer. |
|
|
Internet |
An activity that requires the combination of human input and the use of Internet. |
|
|
Automatic |
A fully automated activity. |
|
|
Decision |
A role dependent activity that results in a choice. A specific case will continue in one of many directions. The case can only follow one path. |
|
|
Meeting |
A meeting in which multiple people from the same role or from different roles participate. |
|
|
Teamwork |
A task in which multiple people from the same role or from different roles participate. |
|
|
Other |
Any other activity. |


The following non-activity standard process step types are available:
|
Process Step |
Description |
|
|---|---|---|
|
|
Manual |
A manually executed activity. |
|
|
Telephone |
A manual activity in which a telephone is used. |
|
|
Computer |
An activity that requires the combination of human input and the use of a computer. |
|
|
Internet |
An activity that requires the combination of human input and the use of Internet. |
|
|
Automatic |
A fully automated activity. |
|
|
Decision |
A role dependent activity that results in a choice. A specific case will continue in one of many directions. The case can only follow one path. |
|
|
Meeting |
A meeting in which multiple people from the same role or from different roles participate. |
|
|
Teamwork |
A task in which multiple people from the same role or from different roles participate. |
|
|
Other |
Any other activity. |
The following navigations / process steps define the way the process flows or have an effect on the process flow:
|
Processtappen |
Omschrijving |
|
|---|---|---|
|
|
Start |
The start or an entry point of a process. |
|
|
Start (timer) |
The start or an entry point of a process triggered by a timer event |
|
|
Start (message) |
The start or an entry point of a process triggered by a message event |
|
|
Parallel start |
Parallel start of a process |
|
|
Parallel start (timer) |
Parallel start of a process triggered by a timer event |
|
|
Parallel start (message) |
Parallel start of a process triggered by a message event |
|
|
Stop (positive) |
The successful end of a process. The point where, for example, the product is delivered or the service is finished. In older versions shown as
|
|
|
Stop (negative) failure |
The non-successful end of a process. |
|
|
Entry |
The start within a subprocess, phase or service. |
|
|
Exit |
The end of the subprocess. At this point the case goes up one level to the process step behind the subprocess.In older versions shown as
|
|
|
Go to |
Execution of the process continues at the process step pointed by the Go to. |
|
|
Start of expanded subprocess |
Marks the begin of an expanded subprocess. |
|
|
End of expanded subprocess |
Marks the end of an expanded subprocess. |
|
|
Start of expanded service |
Marks the begin of an expanded service. |
|
|
End of expanded service |
Marks the end of an expanded service. |
|
|
Start of expanded phase |
Marks the begin of expanded phase. |
|
|
End of expanded phase |
Marks the end of expanded phase. |
|
|
Start of expanded process link |
Marks the begin of expanded process link. In older versions shown as
|
|
|
End of expanded process link |
Marks the end of expanded process link. In older versions shown as
|
|
|
Choice |
A choice in the business process. A specific case will continue in one of many directions. The case can only follow one path. |
|
|
Parallel |
Start of parallel execution of process steps. The case is split at the parallel step into multiple simultaneous threads, one for each outgoing branch. |
|
|
Join |
End of a coupled simultaneous branch |
|
|
Sink |
End of an uncoupled simultaneous branch |
|
|
Go to join |
Execution of a coupled simultaneous branch ends at the Join step pointed by the Go to join. |


Only Entry point, Parallel entry point, Choice and Parallel steps types can be directly inserted by a user. The other step types are automatically created by the tool when necessary.
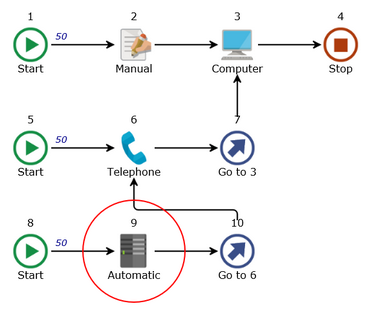
How do I create another Start (Entry Point) to my process?
By default, each process has one entry point that is its start but you can create another
By default, each process has one entry point that is its start. You can create another entry point to a process by selecting a process step and pressing the Start button in the Insert steps group of the Home tab.
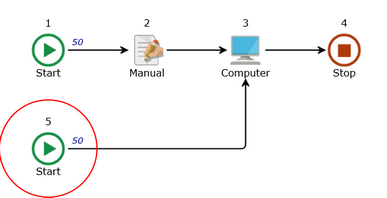
An new start step appears at the left bottom corner of the process diagram and is pointing to the selected step.
In this way, you create a multi-entrant process that can start from different process steps. The set of properties of each of the start steps is automatically extended with the Frequencies property that specify the relative frequencies of selecting particular entry point. This Frequencies property is common for all starts.
You can insert some steps between an entry point step and its destination by selecting the entry point step and pressing one of the button in the Insert steps group.
The entry point step is converted into an entry point branch. It starts with the entry point and ends with the automatically added Go to step. This Go to step cannot be deleted but it can be redirected to another step if necessary. You can delete the whole entry point branch just by deleting its first entry point step.
The step pointed by the entry point or entry point branch cannot be deleted anymore. If you deleted the Computer step in the example above the process diagram would fall apart into two disjoint branches thus it would be not a diagram of one process anymore. In order to delete the Computer step you have first either to redirect the end of the entry point branch to another step (e.g., Manual) or to delete this entry point branch at all.
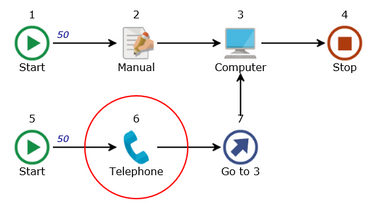
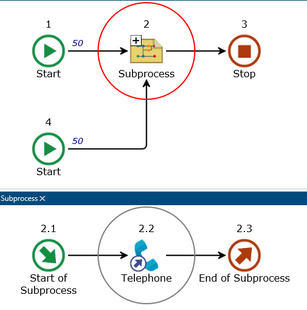
You can create an entry point to a step in another entry point branch
Now, you cannot delete the Telephone step but neither you can delete the whole entry point branch containing Telephone.
You cannot insert an entry point inside a subprocess (phase, service) diagram. However, you can expand this subprocess on the top level diagram and create an entry point to one of steps in the expanded subprocess. Then you can collapse the subprocess again. Notice that there is a small Go to icon on top of the Telephone step inside the Subprocess diagram. It is used to mark the fact that there is an external reference to this step.
You can never create an entry point to a step inside a parallel branch.
You cannot create an entry point if a process already has parallel start branches.
How do I make parallel start branches?
By default each process starts as one thread only. Using Parallel steps you can split this thread into many sub-threads. You can also specify that a start of execution of a process initiates two or more parallel threads. We only require that these threads eventually join somewhere in the process.
To create another starting thread of a process select a process step where the new parallel thread should join with the rest of the process and press the Parallel start button in the Insert steps group of the Home tab.
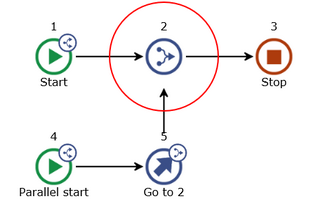
An empty parallel entry branch is drawn below the main process. The Go to join step that appears at the end of this branch cannot be deleted. It points to a Join step that was automatically inserted in front of the selected step. The Start icon of the parallel branch as well as the original main branch is now decorated with a small Parallel icon. This is done to distinguish the parallel starts from the alternative entry points.
You cannot delete a Join step pointed by a parallel entry branch. It will be automatically removed when you delete the parallel entry branch itself.
You can create a parallel start branch joining with another parallel start branch:
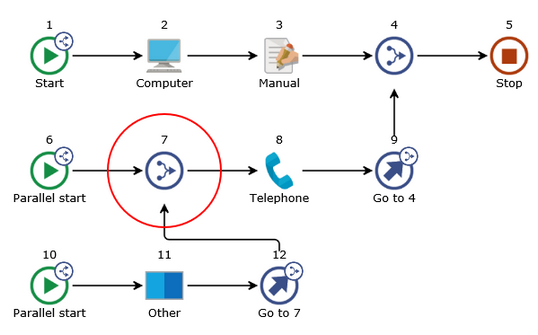
The parallel start branches are drawn one below the other in the order of their creation.
You can create a parallel start inside neither a subprocess (phase, service) diagram nor in an expanded subprocess (phase, service).
You cannot create a parallel start if a process already has entry points.
You can only join a parallel start branch to a process step that is always executed independently of the decisions made in the preceding choices. This is to assure that the parallel threads will always join.
In the example above, you can join a parallel start branch in front of the Manual task but you cannot do this in front of the Computer one because the main thread can stop before it reaches the Computer step.
How do I draw a Join?
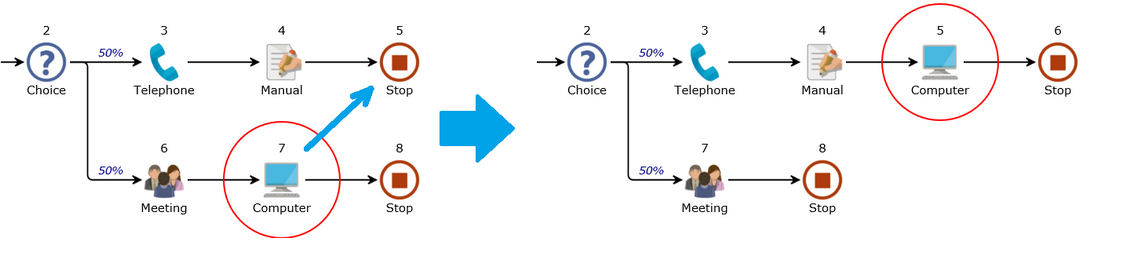
Select a Sink step. Drag it to the process step in front of which you want to join the sink branch.
The Sink step will change into a Go to join step pointing to a Join step that was automatically inserted in front of the destination step. Notice that this Go to join step has a small Join icon on top to distinguish it from the non parallel Go to.
This Go to join step behaves differently than the Go to step (see Creating Go To). In particular, it can be a destination of a Go to. When it is deleted it is converted back to a Sink step and the referred Join is also deleted (if it does not have any other references). The Join step cannot be moved. It can only be deleted which results also in conversion of the Go to join step back to a Sink step. You can also redirect this Go to join. It will result in deletion of the Join step in the old place and creation of another Join step in the new place.
If you drop a Sink or Go to join onto and existing Join no new Join step is created. Instead, an additional connection to this Join step is added. The number of incoming arrows to a Join step represents the number of parallel threads that have to join there. So, you cannot redirect a normal Go to to the Join step.
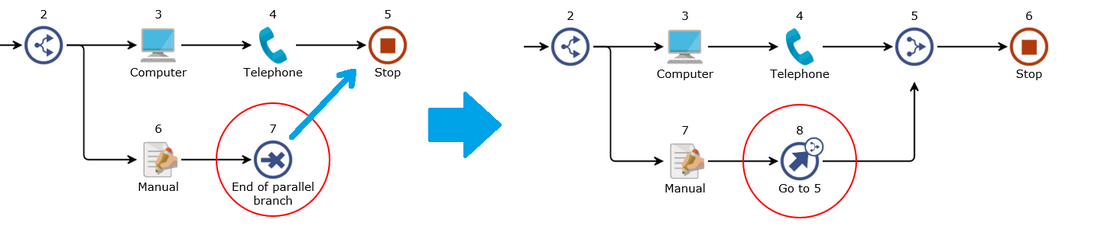
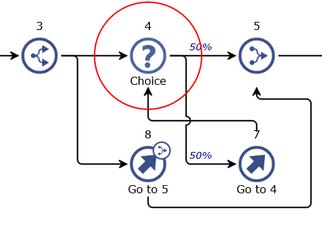
No parallel thread can stop before it reaches the Join or Sink step. So, if you insert a Choice in a parallel branch between a Parallel and Join steps then this choice's branch cannot finish with a Stop, neither can it point to the Join. So, initially a Choice inserted in the parallel branch between Parallel and Join points to itself. Later you can redirect it to the proper destination within this branch.
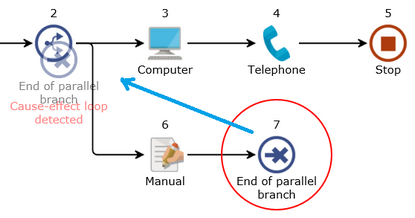
You cannot drop a Sink step in a place that will result in an cause-effect loop in the process. Engage Process Modeler will show you the corresponding message. In the following example, there is an attempt to join the sink branch with its own Parallel. This is not possible because this means that you want to enter Parallel step only after its parallel branch is finished. So, actually you want the effect to precede the cause and this is not allowed.
You can only join a process step that is always executed in the other parallel thread, thus independently of the decisions made in the preceding choices. In the following example
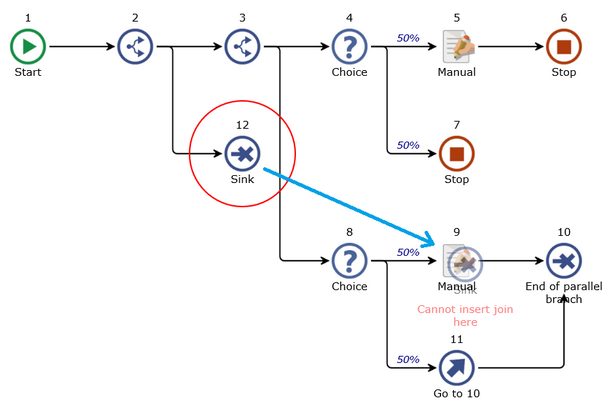
You can join the Sink step with any of the Choice steps but you cannot join it with any of the Manual steps because they are executed conditionally and this means that the joint thread could be finished without reaching the Manual step.
For the similar reasons a Choice inserted into a parallel branch (see step 8) will have its lower branch automatically connected to the corresponding Sink. So, you cannot convert the Go to 10 step into Stop in the example above because this would mean that the parallel thread can break before reaching its end.
How do I delete a subtree?
To delete a subtree right mouse click the first step (the root) of the subtree, then click the small triangle behind the![]() button in the Actions group of the Home tab and select Delete subtree.
button in the Actions group of the Home tab and select Delete subtree.
You can delete a subtree starting neither from Stop, Exit, Join nor Sink steps.
You cannot delete a subtree that starts inside an expanded subprocess, phase or service and that contains the main End of expanded subprocess (phase, service) step of this subprocess (phase, service). The main End of expanded step is the only one that has followers.
You cannot delete a subtree that contains a step that is a destination of an entry point step or an entry point branch (you must first remove the entry point or redirect it).
Alternatives :
| ► | Right mouse click on one of the process step. A pop-up menu will appear. Select Delete subtree. |
How do I add and delete branch to/from my diagram?
The following process steps have at least two outgoing branches:
- Choice
- Decision
- Parallel
In order to append a new branch to such a step right mouse click it and select Add branch from the pop-up menu that appears. A new empty branch will be added to the selected step as the last branch and the Mini property editor will be open for that branch.
Alternatives :
| ► | Double click the step. Mini property editor will appear. Press the plus button there. |
Delete a branch
You can delete a branch if it consists of Stop, Sink or Exit step only. If a branch consists of a Go to step you have to delete it first. If a branch contains more than one step you have to remove them first. Just select the first step of the branch and delete subtree.
To delete a branch right mouse click its step and select Delete Branch or Delete from the pop-up menu that appears.
You can only delete a branch if there are at least three branches outgoing from the parent step (thus, at least two branches must be left).
A branch that starts inside an expanded subprocess (phase, service) and that contains the main End of expanded subprocess (phase, service) step of this subprocess (phase, service) cannot be deleted. The main End of expanded step is the only one that has followers.
How do I reorder branches?
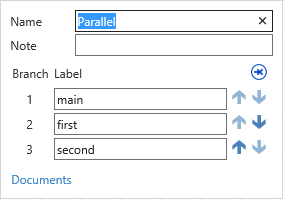
You can reorder branches of a Choice, Decision and Parallel steps in the following way:
Double click the step to open the Mini property editor. Use the arrows up ![]() and arrows down
and arrows down ![]() to move branches one level up or down.
to move branches one level up or down.
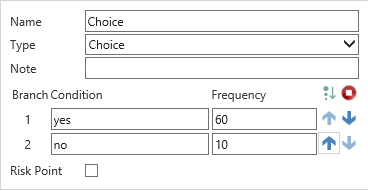
For a Choice and Decision step, you can also sort branches according to the value of the Frequency (with the highest frequency on top). Just press the ![]() button. This button is disabled if the user has already rearranged steps himself.
button. This button is disabled if the user has already rearranged steps himself.
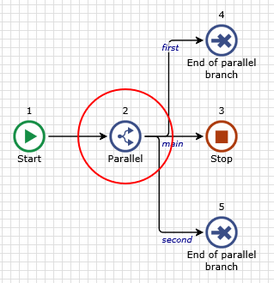
The main branch of the Parallel step (thus, the one that ends with a Stop or Exit step) is always the first on the list. In general, it cannot be swapped with any other branch. So, you can reorder only the second and the next branches. However, there are two exceptions from this rule.
- If you have a fork-join construct where the first parallel branch contains a Join step that is joining the end(s) of the other parallel branch(es), then it is possible to swap the first branch contained between the Parallel and Join steps with the other (joint) branch of this Parallel.
- If the first branch of the Split step can be converted into a parallel branch (thus, it does not have any external incoming or outgoing Go Tos) then it can be swapped with any other branch of this Split
Additionally, using the Design mode, you can change position of any step in the diagram. In this way, you can also move, e.g., the third branch of a Parallel step on top of its main branch. When you open the Mini property editor the main branch will be still the first one in the list. Swapping the second and the third branch there will result in swapping the top and the bottom branch on the diagram.
You can also reorder the (parallel) entry points. Similarly as for a Parallel step, the main branch of the process and is always the first on the list even if the entry point branch(es) themselves are moved on top of the main branch using the Design mode.
How can I cut/copy and paste in my process?
To cut or copy a process step click this step and then press the Cut or Copy button in the Actions group of the Home tab, respectively.
To cut or copy a subtree starting from a given step click this step and then press the small triangle close to the Cut or Copy button in the Actions group of the Home tab and select Cut Subtree or Copy Subtree, respectively.
To paste a process step click a process step in front of which you want to paste and then press the Paste button in the Actions group of the Home tab.
To paste a subtree click a Stop, Exit or Sink step and then press the Paste button in the Actions group of the Home tab.
Restrictions:
You can paste neither in front of Start, Parallel start or Entry steps. However, you can paste in front of the Start representing an entry point.
Alternatives:
| ► | Cut: Right mouse click the step and select Cut. |
| ► | Copy: Right mouse click the step and select Copy. |
| ► | Cut subtree: Right mouse click the starting step and select Cut subtree. |
| ► | Copy subtree: Right mouse click the starting step and select Copy subtree. |
| ► | Paste: Right mouse click the step in front of which you want to paste and select Paste. |
You can also use the standard keyboard shortcuts to cut, copy and paste a single step.
Unlike for the project elements, if you cut a process step then it is immediately deleted.
How do I create a Go To step?
Create a Go To be dragging:
Slect a Stop or Exit. Then, drag it to the process step to which you want to make the connection.
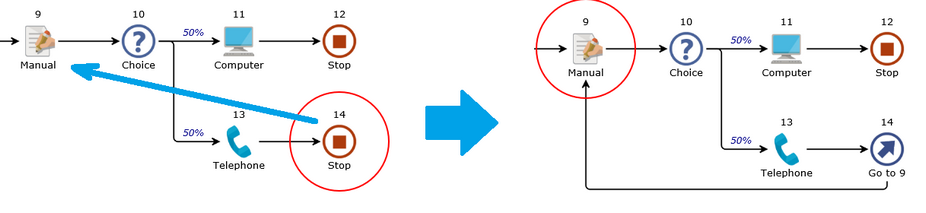
The Stop or Exit will change into a Go to step. If the connection is not visible, check the Connections box in the Show/hide group in the Layout tab.
Once a Go to step is created you can redirect it by dragging and dropping it onto another destination.
You cannot create a Go to to a Start, Stop, Sink, Join, Entry, Exit, End of expanded subprocess (phase, service).
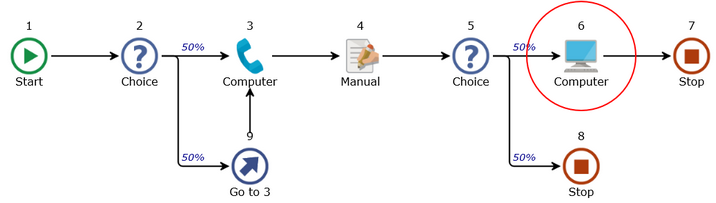
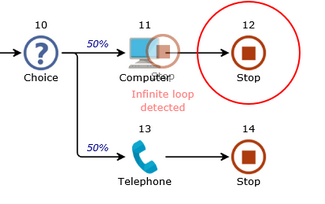
You cannot drop a Stop, Exit or Go to step in a place that will result in an infinite loop in the process. Engage Process Modeler will show you the corresponding message.
Create a Go To from Insert Menu:
To create a Go to step by specifying its destination select a Stop, Sink or Exit step and press the Go to button in the Insert group of the Home tab in the ribbon.

You can also select the existing Go to step if you want to change its destination. You will be warned if the currently selected step is of the wrong type. The following dialog appears:
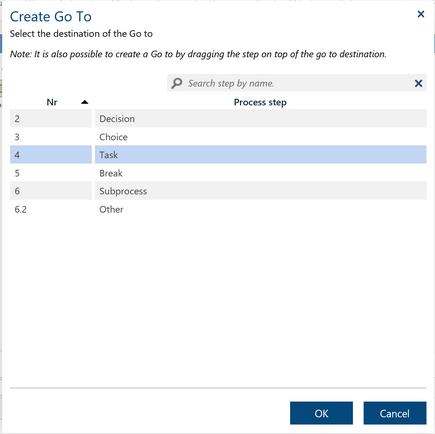
The list of process steps that is shown contains all possible destinations. Since you cannot jump into a parallel branch the steps from such branches will be excluded. But, you can jump into a subprocess, so all steps from all lower level subprocesses will be included. However, this list will be totally different if you select a step ending a parallel branch. Now, you can jump inside another parallel branch but you cannot jump into a subprocess or in a choice's branch.
You can also start typing the name of the require destination in the search box above the process step list. The list will be automatically filtered while you type.
Select the required destination and press OK. The originally selected step will be converted to the Go to step with the selected destination.
Alternatives :
| ► | Right mouse click on the process step of the right type. A pop-up menu will appear. Select Insert and then Go to. |
How do I move steps around in my diagram?
Moving a Process Step:
Select the process step that you want to move. Drag the process step to the process step in front of which you want to move the step.
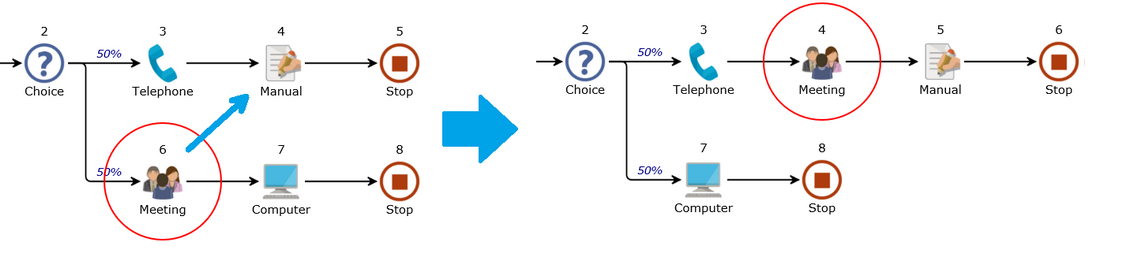
If you drag a process step that is a root of a process subtree onto a Stop, Exit or Sink step a question will appear. Answer ‘No’ if you want to drag one process step only.

If you move a Choice or Parallel step then all its branches except the first one are moved as well.
If you move a Begin of expanded subprocess (phase, service) step then the whole expanded subprocess (phase, service) is moved.
You cannot drag a step that you cannot delete (see Delete process step).
You cannot drop a step in place where you cannot insert (see Insert process step).
Moving an activity step in the swim lane view have different result (see Drag and drop in swim lane view).
If you press the <Ctrl> key while dropping a step a copy of the step will be created.
Moving a Subtree:
Select the process step that is a begin (a root) of a subtree you want to move. Drag this process step to a Stop, Sink or Exit step and answer ‘Yes’ to the question that appears.

Drag and Drop in swom lane view
If you are modeling in the swim lane view. The behavior of insert and drag and drop is different. More can be found in the article: What are SwimLanes?
Restrictions:
| • | You cannot drag a subtree starting from a step that you cannot delete (see Delete process step). |
| • | You cannot drag a subtree that starts inside an expanded subprocess (phase, service) and that contains the main End of expanded subprocess (phase, service) step of this subprocess phase, (service). |
| • | You cannot drag subtree starting from a Join step. |
Can I select more than one step at once?
You can select more than one process step by pressing <Ctrl>, <Shift> or <Ctrl>+<Shift> while clicking another step. If <Shift> is pressed and there is a path between the step being selected and the previously selected step then all steps between these two steps will be also selected.
You can also draw a box over the steps selecting, in this way, all the steps that fall inside the box. Just click a white space and drag the cursor over the steps you want to select.
When you select more than one process step then the Properties pane or the Mini property editor will show only the properties that are common for all selected steps. If the value of the property is the same for all the selected steps then it will also be shown in the window otherwise the value will be empty.
You can use the multiple selection for three purposes:
| • | To delete, cut, copy or move the selected part. |
| • | To change the value of the common property (for example to assign the same role to all selected tasks). |
| • | To extract a subprocess |
The part of a process diagram that can be cut, copy or moved is supposed to be inserted in another place of the same or another diagram in front of a process step or at one of the process branch ends. Thus, the steps in this part must be connected and the part must have exactly one entry point and at most one exit point. Moreover, it should be allowed to delete the entry step and the part must fully contain expanded subprocesses (phases, service).
For the delete operation, the set of selected steps must consist of one or more connected parts and it must be possible to delete each of these parts separately.
How do I expand and collapse sections of a process?
Subprocesses are used to structure a process design in order to make it more readable and better navigable. Sometimes it is required to have an overall view that shows the process and the content of its subprocesses on the same diagram. For example, this is necessary for the overall swim lane view.
In order to expand a subprocess (phase, service) click a small plus sign on top of its icon.
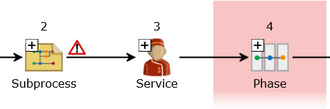
The content of the subprocess will be inserted in place of the subprocess step and the Begin of expanded subprocess and End of expanded subprocess steps will be added in front and at the end of the inserted steps.
In order to collapse a subprocess click a small minus sign on top of Begin of expanded subprocess or End of expanded subprocess icon.

If the collapsed process contains a Stop step then its collapsed icon will be marked by a small Stop icon on the right hand side. Since the positive and negative stops have different icons you will see one of them or both depending what is inside the subprocess.

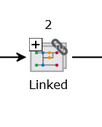
You can also expand and collapse process links. In general, the operations of expanding and collapsing of process links behave similarly as for subprocesses.
In order to expand a process link click on a small plus sign on top of its icon. If the linked process is not specified yet in the process link then the plus sign is not shown at all. If the linked process was deleted the Expand operation will have no effect.
Alternatives:
| ► | Right mouse click a process link step and select Expand. |
In order to collapse a process link click a small minus sign on top of Begin of expanded process link or End of expanded process link icon.
Alternatives:
| ► | Right mouse click Begin of expanded process link or End of expanded process link and select Collapse |
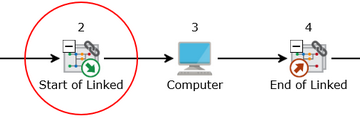
If an expanded process has more than one entry points then only the one specified in the link is taken into account in the expansion. The part of the linked process that is not reachable from the specified entry point is not included into the expansion.
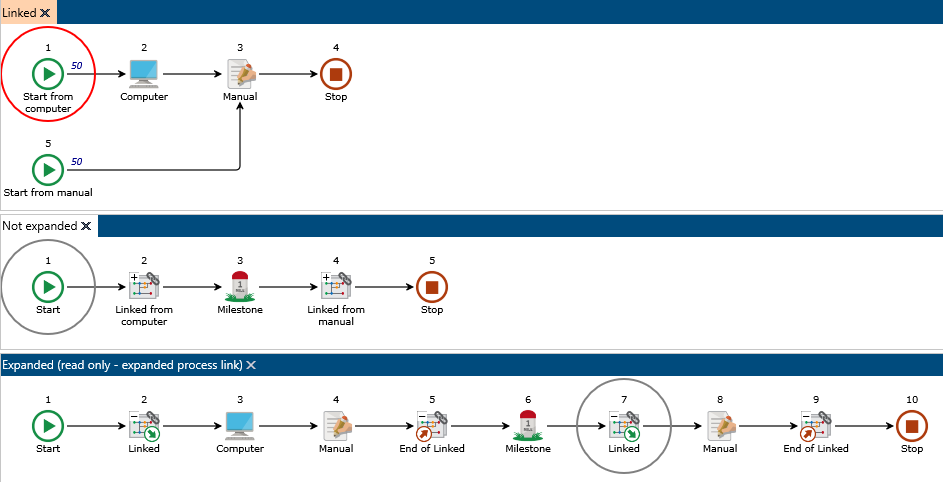
Consider the following example. Both process links in the Not expanded process are linked to the Linked process. However, the first process link of is linked to Start from computer entry point, whereas the second one to Start from manual. Thus, the first expanded link contains both tasks, but the second one contains only the Manual task because the Computer task is not reachable from the Start from manual entry point.
..