
SwimLanes enable you to see the process from different angles by focusing on different aspects like locations of steps or applications used
Press the Swimlanes button in the Layout group on the Layout tab. The drop down menu opens with at least two items: Roles Swimlanes and Value Added Swimlanes.
If you have defined your own custom types there will be there extra buttons for swimlanes based on those types (not available in Engage Process Modeler Starter edition)
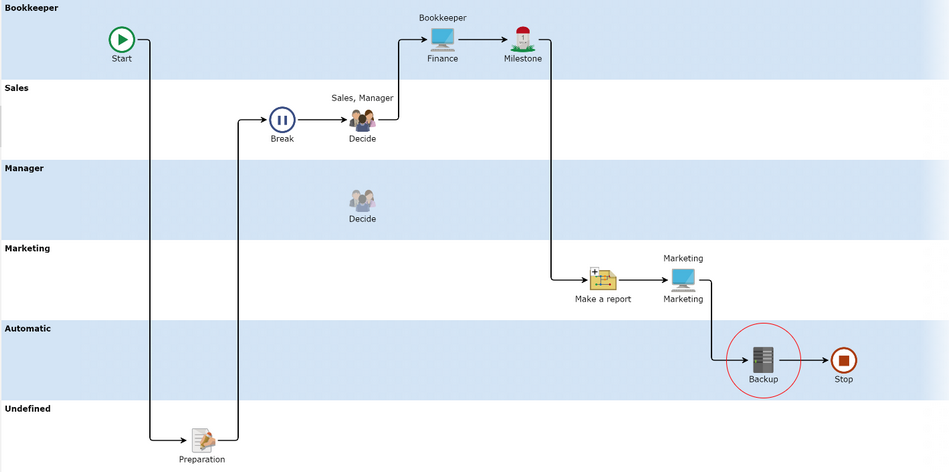
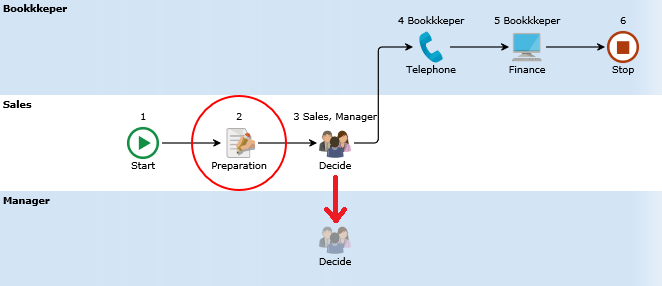
In this layout, the activities that are executed by the same role (have the same value added or have the same custom type value) are drawn in the same lane. If there is more than one role assigned to a process step then it is drawn in all relevant lanes (e.g., Decide meeting in the diagram above).
The lanes are drawn only for those roles (values added values, custom type values) that are used in the process.
The steps that do not have the Roles (Value added, custom type) value assigned yet are drawn in the additional lane called Undefined (see, e.g., Preparation task).
The steps that do not have the Roles (Value added, custom type) property at all are drawn in the lanes appropriate for their predecessors or successors except the Start step that is always drawn in the first lane.
In the Roles Swimlanes, all automatic tasks, even though they cannot have roles assigned by definition, are drawn in a separate lane called Automatic (see the Backup task in the diagram above).
If the Start step has the property used to create swim lanes then it must be drawn in the lane corresponding to the value of this property. Initially, this lane is put on top to follow the rule that Start is always in the first lane. You can later reorder the lanes.
As you can see above, the Break and Subprocess steps are drawn in the lanes appropriate for their successors. The same applies for Choice, Parallel, and Process Link. Only Milestone steps are drawn in the lanes appropriate for their predecessors.
You can continue modeling in the swim lane view. However, the behavior of insert and drag and drop is different now.
The swim lanes can be combined with the Full Screen mode.
The initial order of the lanes in the swim lane view is determined automatically. The user can change this order by dragging and dropping role names in the first column of the view.
Press Value stream button to return to the standard process view.
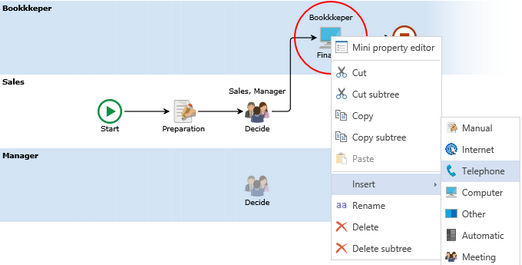
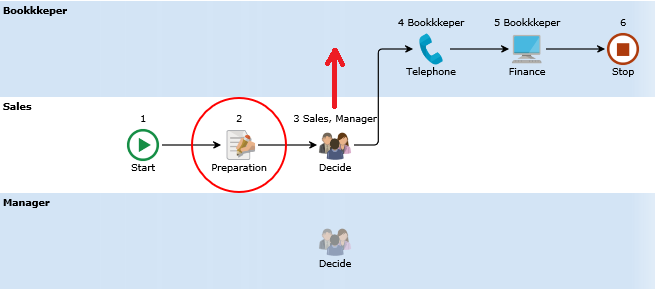
Insert in SwimLane view:
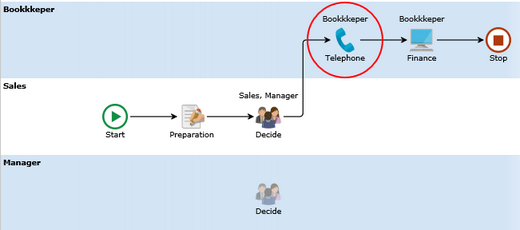
If you insert an activity in swim lane view in front of a step in a given lane then the newly inserted activity gets automatically the role of the lane:
Drag and Drop in Swim lane view
The behaviour of dragging and dropping in the swim lane view depends on the dragged step type. The behavior for non activities is the same as in the value stream view.
The behaviour of dragging activities in role swim lane view depends on whether you are dragging a single role step or you are dragging a multiple role step.
Rearranging steps in swim lane view is also limited. You can only move one step at a time.
Dragging a single role step
If you drag a single role task from one lane and drop it onto another lane (but not on the top of another step)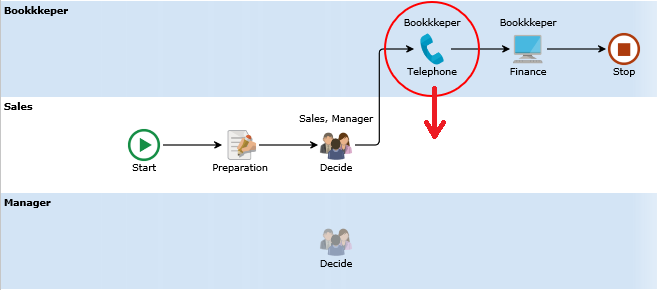
then the task changes its role into the role of the lane it is dropped onto. If you drag a single role task from one lane and drop it onto another step in another or the same lane
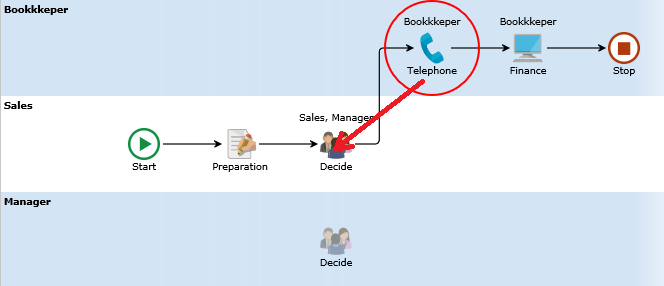
then the task changes the position in the diagram only, its role remains unchanged: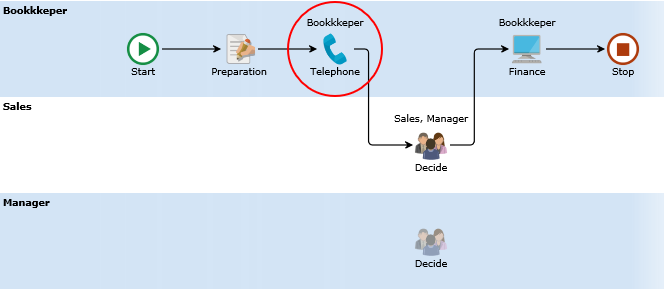
Dragging a multiple role step
Multiple role activity in a swimlane layout will be shown as multiple icons one over the other, each of them in a lane corresponding to one activity's role. All of these icons are a little bit lighter except the only one that corresponds to the activity's owner role or the first role in the Roles list, if the owner is not specified. We will call this one icon the main one and the lighter icon the secondary one. All of them represent the same activity but moving them around the diagram will have different results. Only the main icon is connected by arrows with the other icons.
If you drag the main icon from one lane and drop it onto another step in another or the same lane then the activity changes the position in the diagram only, its roles remain unchanged. Thus, we have here the same behavior as for a single role step.
If you drag the main icon from one lane and drop it onto another lane (but not on top of another step)
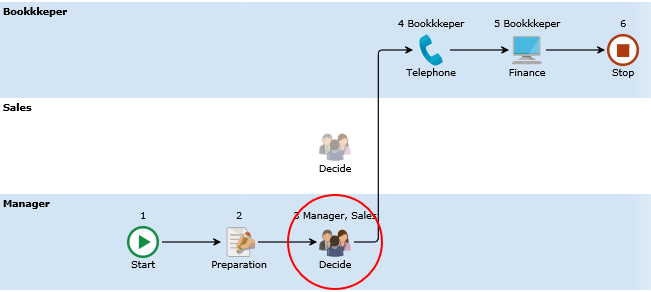
then the role of the lane the main icon is dropped onto (Bookkeeper) is replacing the owner's role of the step or the first role (Sales) in the roles list (if the owner is not defined). As a result the main icon moves to another lane (the secondary icons remain unmoved in their lanes).
Notice that because the Sales role was only used by the meeting and now was replaced by Bookkeeper the lane for Sales is removed.
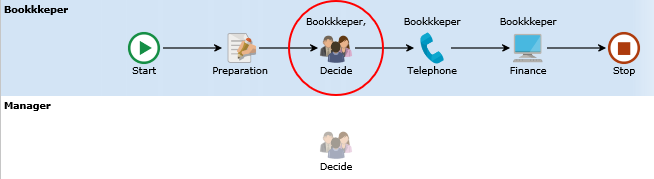
If you drag the main icon onto the secondary icon
then only the owner of the activity is changed so the main icon swaps with the secondary one.
You can also drag the secondary icon of the multiple role step and drop it on any lane in the diagram. There are the following possibilities:
- The destination lane is the same as the source lane - nothing happens.
- The destination lane is assigned to one of the step's roles - the role of the source lane disappears from the list of roles and the secondary icon disappears as well.
- The destination lane is not assigned to any of the step's roles - the source lane role disappears from the list and the destination role is added to the list, the secondary icon is moved to the other lane.