Evaluation is a mathematical analysis based on solving a set of numerical equations.
Evaluation is done under the assumption that there are no resource constraints in the process, i.e., there is always enough people available to perform any task.
You can:
- Evaluate process – the whole process is evaluated.
- Evaluate selected path - only the process steps that are on the selected path are taken into account.
- Determine critical path - the path will be found in the process for which the total value of the selected measure is the biggest.
If the process evaluation is done while the Filtering is on then only visible process steps are taken into account in the calculation (as well as Parallel and Join steps). The hidden steps are treated as non-existing.
Evaluate process:
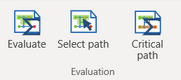
To evaluate the performance indicators of the whole process, select a step of the process in the Diagram pane and then press the Evaluate button in the Evaluation group in the Analysis tab.
Note: If you were working in the Modeling view mode, Engage Process Modeler would automatically activate the Evaluation view mode after evaluation is done (see View modes).
The Results for any Stop or Sink step of the process contain values calculated under the assumption that the process ends in this step.
If a process has entry points then an entry point Results contain values calculated under the assumption that the process starts from this entry point. You can find the performance indicators for the whole process in the Process results category or in the Results category of the corresponding process element in the Project pane. Thus, if a process has only one Start and one Stop then their Results and Process results are the same.
Evaluate selected path:
You can specify your own path(s) through the process to evaluate only this part. This can be done by pressing the Select path button in the Evaluation group of the Analysis tab. If a Stop step was selected at the moment of pressing the button then all steps belonging to the path from any Start to this stop are marked. otherwise all steps of the process are marked as selected.
Now, you can define your path by removing some steps from the already selected path. The set of steps that you can remove is dynamic and depends on what you have already removed. The steps that you can actually click to add to or remove from the path are marked additionally by a dotted frame.
Click on one of those steps while pressing <Ctrl> key. The step becomes unmarked and probably some other steps around are now unmarked too. This is because the marked set of steps must always compose a continuous path from the begin to an end. You can add an unmarked step back to the path by clicking it again with the <Ctrl> key pressed.
Once the path is marked you can evaluate it. When performing an evaluation of a specific path, the process will be considered to be made of this path only. By selecting an individual process step, you will find the results for this step. Process steps not belonging to the selected path will not have any results.
You cannot edit the structure of the process when the path is marked. Press Select Path button again to remove the marking and to return to the editing mode.
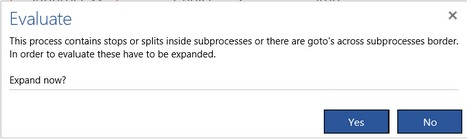
If your process has subprocesses, services or phases containing stops then these modules must be expanded first so that all stops of the process are visible on the main level. Engage Process Modeler will do it for you when you click the Select Path button. The following question will appear:
Critical path:
To determine the critical path of a process, select a step of the process in the Diagram pane and then press the Critical path button in the Evaluation group in the Analysis tab. The following dialog appears:
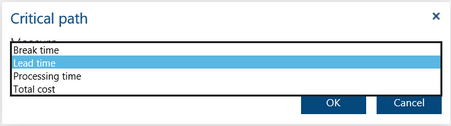
Select the measure for which you want to determine the critical path and press OK. By default, the Lead time is selected here because usually the longest path in time is the most interesting. But, in this way, you can also find a path with the biggest cost, the biggest break time or the biggest processing time.
Evaluation Results:
Consider the following process diagram with processing time shown on top of the process steps:
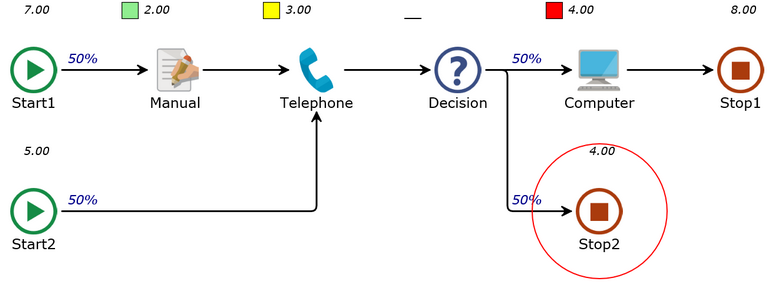
The input values for processing time of the Manual, Telephone and Computer steps are 2, 3 and 4, respectively. The results of evaluation are shown above the start and stop steps.
If the process is started from Start1 its processing time is equal to 2 + 3 + 50%*4 = 7
If the process is started from Start2 its processing time is equal to 3 + 50%*4 = 5
If the process ends in Stop1 its processing time is equal to 50%*2 + 3 + 4 = 8
If the process ends in Stop2 its processing time is equal to 50%*2 + 3 = 4
However, the average total processing time of this process is equal to (7 + 5 + 8 + 4) / 4 = 6.
After the evaluation, the process diagram view automatically switches to the evaluation mode. You will see two additional categories in the Property pane: Results and Process results. Results are showing the values for the selected step whereas Process results are always showing the average total results for the whole process.
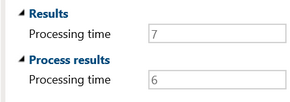
The same process results are shown in the Properties pane when you select the evaluated process in the Project pane.
Why won't evaluation work?
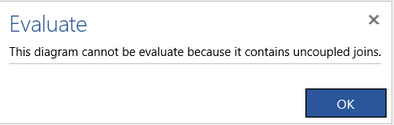
If a process contains a Join step then evaluation is only possible if its all joining branches start from the same parallel step and all branches of this parallel step end eventually in a sink or a join step (so, in fact the Join steps are only used in a fork-join construct). If this is not the case you will get a message:
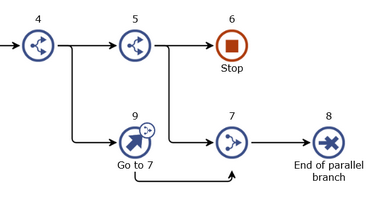
For example, the following diagram can be evaluated because we can recognize here the following fork-join pairs: 4-6, 5-6, 7-8 and 7-9

The following diagram cannot be evaluated because not all branches starting in the parallel step 4 or 5 end in the join step 7: