Using filtering you can temporarily hide some process steps in the process diagram (and in all its subprocesses)
In general you can hide any process step type that does not influence the process flow structure. Thus, you cannot hide Start, Stop, Exit, Choice, Decision, and Sink.
Parallel and Join can be hidden but since they also define the process structure they are in fact replaced by splitting or joining lines. Hiding a Goto step means that its incoming line goes directly to the destination of its outgoing line.
For all the other step types you can treat the hiding as their temporal deletion from the process diagram.
You can specify what step types should be shown or hidden on the diagram using the Process Diagram Filter. Initially, the filter accepts all process steps. You can:
- Modify filter to decide what steps must be filtered out
- Apply filter to hide the filtered out steps on the current process diagram; all steps inserted afterwards will not be hidden
- Reapply filter to hide also the steps that were inserted after the last (re)application of the filter
All these functions are available in the Diagram Filter group of the Layout tab.

If the process Evaluation is executed while the filter is on then only visible process steps (and invisible Parallel and Join steps) will be taken into account in the calculation. The same applies to downloads in an external format, e.g. PDF. All internal formats keep also the information about the filter. Thus, if you Save as, Download in Engage native format or make an on-screen report then all process step will be taken into account.
Modify Filter:
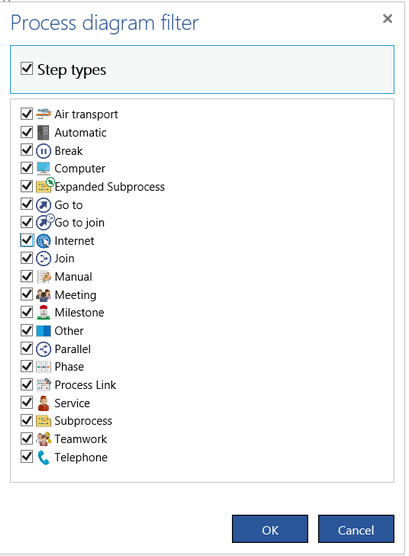
Initially the filter accepts all process steps. In order to change it press the Modify Filter button in the Diagram Filter group of the Layout tab. The following dialog appears:

Uncheck a corresponding check box if you want to hide all steps of the given type.
If you have already defined your own step types they also be on this list (Air transport in the example above).
Check the Step types box if you want to select all possible step types to be not filtered out. Uncheck this box to uncheck all steps types at once.
Press OK to save the current status of the filter. The filter will be automatically applied to the process diagram and all diagrams of its subprocesses .
You can use the filter to obtain a more compact view where all starts and ends of expanded subprocesses as well as all goto steps are not visible on the diagram. Steps of these types are used in Engage Process Modeler only to mark the borders of the expanded subprocesses and the jumps from one branch to the other. Their role is only technical and they do not contribute to the actual process map. Just uncheck Expanded Subprocess, Go to and Go to join boxes.
Filtering by step properties:
You can filter a diagram not only by step types but also by step properties. The following properties are taken into account:
- Roles
- Value Added
- Custom Types (local and global)
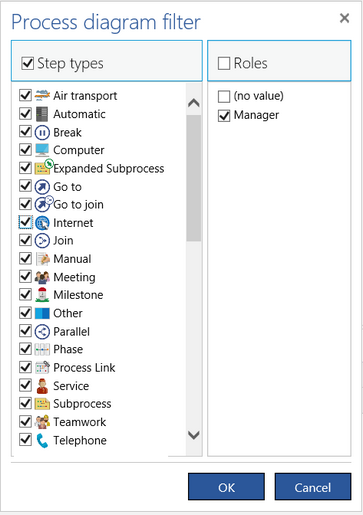
Before the diagram filter dialog is open, there is a check on what of these properties are really used in the process diagram. Then, only the used properties are shown.

On the dialog above, you can see that only the role Manager is used in the diagram.
By default, nothing is selected in the Roles part. This means that the filtering on the Roles property is not applies at all. You will get the same result if you select all check boxes in the Roles part. This means that the filter is applied but nothing is filtered out.
If only the Manager is checked then tasks without the role Manager will be filtered out. If only (no value) is checked then all tasks with role Manager will be filtered out.
Although the Decision steps also have the Roles property they are never filter out.
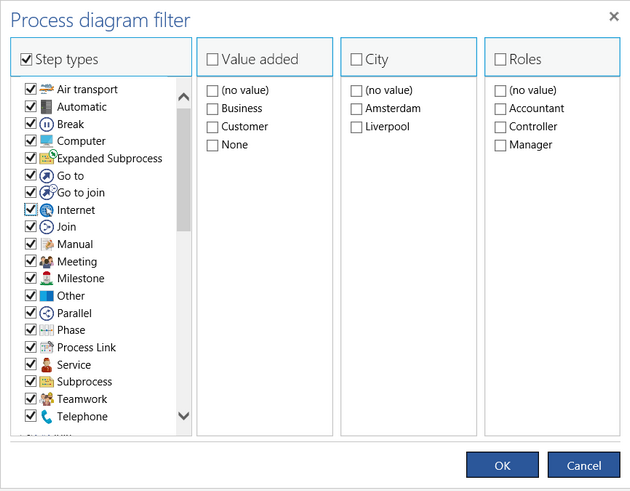
In the example below, all three Value Added property values are used, two custom values of the type City and three Roles.

How do I apply and reapply a filter to my process?
Apply Filter:
Press the Filter button in the Diagram Filter group in the Layout tab to apply the actual filter to the process diagram and all its subprocess diagrams. (It will be automatically applied when you click OK after modifying filter)
The steps not accepted by the filter will be hidden and the Filter button will stay highlighted. The filter indicator ![]() will be shown in the right upper corner of the diagram. This is to remind you that maybe you do not see the whole diagram. If you now insert a new step it remains visible on the diagram even if it is not accepted by the applied filter. You must press Reapply Filter to apply the filter also to the steps that were inserted after pressing the Filter button.
will be shown in the right upper corner of the diagram. This is to remind you that maybe you do not see the whole diagram. If you now insert a new step it remains visible on the diagram even if it is not accepted by the applied filter. You must press Reapply Filter to apply the filter also to the steps that were inserted after pressing the Filter button.
If you press Modify Filter button while the Filter button is highlighted, and then do some changed in the filter and press OK, the filter will be automatically reapplied to the diagram.
Press the highlighted Filter button again to switch off the filter and show all diagram steps again.
Note that the filter applies to the whole process thus to its main level diagram as well as to diagrams of all its subprocesses.
Reapply Filter:
Once you press the Filter button the filter is applied to the current process diagram. All steps that are inserted later will be not filtered.
Press the Reapply Filter button in the Diagram Filter group in Layout tab to apply the filter again to the current diagram. This button is enabled only if the filter is switched on. If this button is disabled press the Filter button instead.
Why won't the 'filter' work?
Filtering is an operation that changes the diagram layout. It can only be applied to automatic layout. If you have already changed manually the layout of one of the (sub)process diagrams using functions from the Design tab and you press Filter then the filtered diagram will be shown in the preview mode.
You can still change manually the layout of the filtered process. However, as soon as you remove, reapply or modify the filter these changes will be lost because, again, the filter can only be applied to automatic layout. The following question will warn you:

