
Adding/Removing Group Members:
To add or remove group members select the group in the list and click on the Add / Remove behind Members on the right hand side. The following dialog appears:
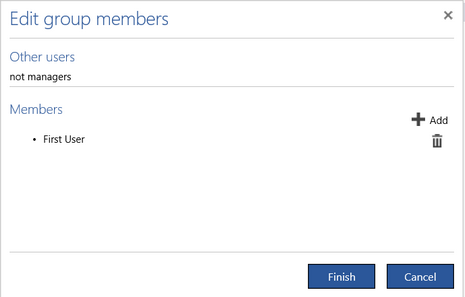
Press the trash bin button to remove a user from the group.
Press Add to open a list of users and select some of them as members of this group.
Press Finish to apply the changes.
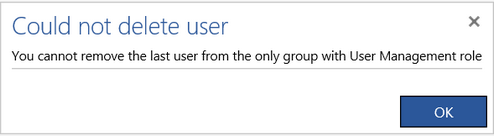
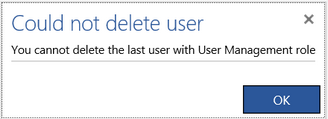
If you try to remove the last user from the only group with the User Manager role you will get an error message because this is not allowed.

Adding/Removing Licenses:
To add or remove licenses select the user in the list and click on the Add / Remove behind Licenses on the right hand side. The following dialog appears:
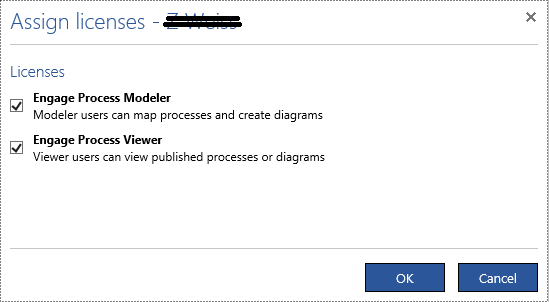
The Engage Process Viewer check box appears only for the Engage Process Suite edition.
Uncheck the Engage Process Modeler (Engage Process Viewer) box and press OK. From now on, the user will not be able to login to Engage Process Modeler (Engage Process Viewer). The number of available Engage Process Modeler (Engage Process Viewer) licenses will increase and you can assign it to another user who does not have it.
If there are no more Engage Process Modeler (Engage Process Viewer) licenses available, the unchecked Engage Process Modeler (Engage Process Viewer) box will be disabled.
If you need more licenses, ask for extra Engage Process Modeler Team subscriptions or upgrade your Engage Process Suite subscription.
How will the 'user's roles' settings help me with my Engage Process environment?
Unlike in the Engage Process Modeler Professional where the only user can do everything, each user of a team can have some set of roles assigned that determine the functionality available for that user. The following roles are available in Engage Process Modeler Team:
- User manager - a user in this role can open Users & Groups setting tool. At least one user in a team must be in this role. (for Engage Process Modeler Suite edition this user can also open Security settings.)
- Project creator - a user in this role can create a new project or create a version of an existing project
- Modeling manager - a user in this role can create and manage icon sets and icons styles
- Subscription manager - a user in this role can see and manage the Engage Process subscription
Since every user of Engage Process Modeler Team can always create a new project the role Project creator is automatically assigned to every new user and cannot be removed.
The first user of the organization gets automatically all roles.
Two additional roles are available for Engage Process Modeler Suite edition:
- Tables manager - a user in this role can open Tables setting tool.
- Publisher - a user in this role can run the Engage Process Publisher.
Adding/Removing Roles:
To add/remove roles to/from a group or a user select it in the list and click on the Add / Remove button behind Roles on the right hand side. The following dialog appears:
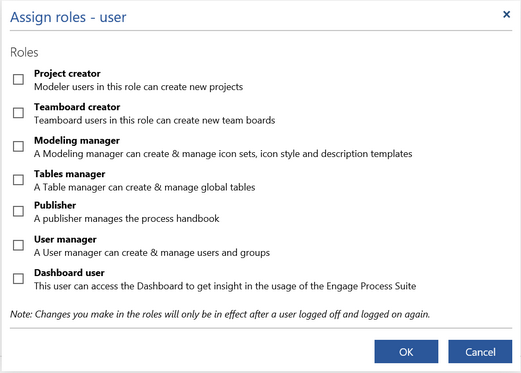
For the Engage Process Modeler Team edition the Project creator role is always assigned to every user and it will be not even shown in this dialog.
Teamboard creator, Publisher and Tables manager roles are shown for the Suite and Enterprise editions only.
There is an additional role called Dashboard user that is available in the Enterprise edition. A user in this role can run Engage Process Dashboard.
Check the roles you want to add and/or uncheck the roles you want to remove and press OK. You cannot remove the User manager role from the last user/group who has it. The User manager check box will be disabled then.
Adding/Removing Groups:
To add or remove groups select the user in the list and click on the Add / Remove button behind Groups on the right hand side. The following dialog appears:
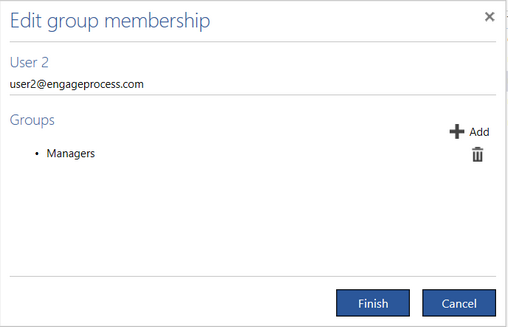
Press the trash bin button to remove the user from the group.
Press Add to open a list of groups and to assign some of them as groups of this user.
Press Finish to apply the changes.
If you try to remove the last user from the only group with the User Manager role you will get an error message because this is not allowed:
Creating a New group
To add a new group click on the Add group on top of the list. The following dialog appears:
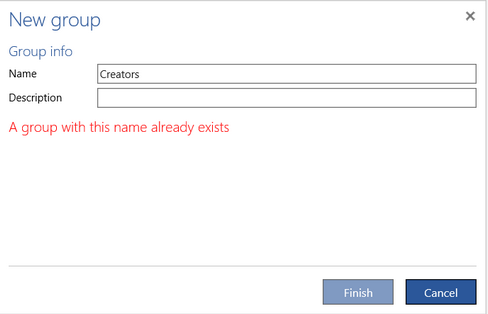
The Name of the group must be unique in the organization.
Deleting Users/Groups:
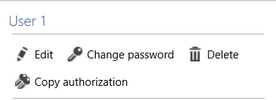
To delete a user select him in the list and click the Delete button on the right hand side.
A user can only be deleted if he does not belong to any group. If this is not the case, you get the following message:
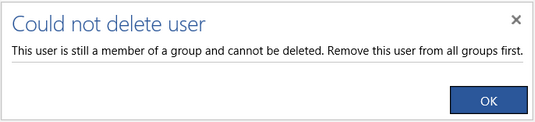
...and you have to remove all groups of this user.
You can only deleted an empty group, If this is not the case, you will get the following message: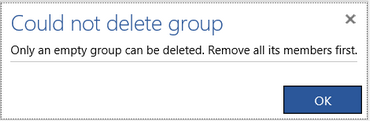
...and you have to remove all group's members.
The last user in the User manager role cannot be deleted - there should always be a member of the team who can manage the other members. If you try to do this you will get the following message:
See also Deleting authorized users/groups for more restrictions on deleting in the Suite edition.
Deleting Authorized Users/Groups:
The last user in the User manager role cannot be deleted, because there should always be a member of the team who can manage the others.
A similar rule applies to users and groups in the the Engage Process Suite edition concerning the authorization. Every project, folder and diagram must have at least one user who has the full control over it. Thus, you cannot delete a user or a group that is the last one having the Read and Authorize rights on certain element. If this is the case the following message appears:

The message contains a detailed list of authorized elements where the user/group is the only one with the Authorize right. Only the highest authorized element is mentioned there. So, the project 'B' on the list above means that the user has the Authorize right for the project but he can also be the only one who has the Authorize right for the folders or diagrams in it.
The transfer of rights can be done by the user that is to be deleted in Engage Process Modeler by giving another user(s) or group(s) the Authorize right to all the elements that he is authorized for. This, however, could be not possible if the user is not available anymore.
Thus, the transfer of rights can also be done by the user manager himself by copying all the rights of the deleted user/group to another user/group in one simple operation.
Select a user and press Copy authorization button (this button is only available in Engage Process Suite edition):
The following dialog appears:
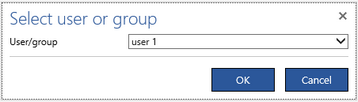
Initially the selected user is also selected in the User/group combo box (user 1 in this case). Choose another user or group from the combo box (say user 2) and press OK. The individual rights of the user 2 will be extended with all individual rights of the selected user 1. In particular, the user 2 can authorized elements that the user 1 could. So, the user 1 can be deleted now.
If both users belong to the same groups then, from now on, the user 2 can do the same with the elements as the user 1 could do. If thy do not belong to the same groups their inherited rights can be different. The user manager can fix this by adding the user 2 to the missing groups.
The Copy authorization operation can be useful when a user stops working for the organization. Notice that his operation is not undoable. In order to revert its effect the user 2 must manually remove the added rights in the Engage Process Modeler..
If a group is the only one that have rights for certain element then this group cannot be deleted but it can be emptied. Then, no user can access that element. This situation can always be fixed by the user manager by adding a user to this group or by copying the group's rights to another user.
You can select multiple user and then press Copy authorization to copy authorizations of all of them in one go to the selected user/group