
If, for some reasons, you do not like the automatic arrangement and decide to change a position of one of the steps in the diagram then this will have some consequences on the way the steps will be arranged in this diagram later
You can rearrange steps either by dragging and dropping them on the required place or by using block operations.
You can always return to an automatic arrangement.
Consequences of moving steps yourself:
Engage Process Modeler calculates itself the positions of the process step icons in the diagram. Icons are always placed in a grid, at most one per cell, so they are sorted out in columns and rows. All the other components like labels, input/output balloons and arrows are always drawn relatively to their step icon. So, if you decide to change the position of the step name and move it to the middle of the icon then it will be always shown in the middle of this icon wherever the icon is placed.
An automatic arrangement is calculated always for all steps in the diagram and it depends only on the set of the steps and the parent-child relation between them. If you rearrange at least one step of the diagram yourself the automatic arrangement is not calculated anymore because it would destroy your rearrangement. Instead, when you insert or delete a step Engage Process Modeler tries to create a space or fill the gap by moving some steps around the place involved. This is done by a heuristic, context depended algorithm and can give sometimes unexpected results.
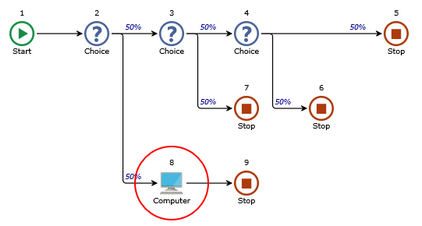
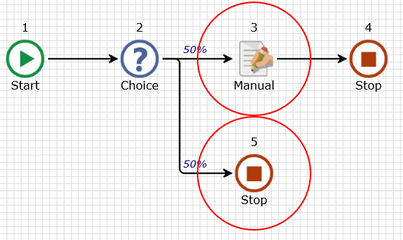
Consider a simple example of the user modified arrangement (the step 5 was moved one cell to the right):
Now we will insert a Telephone step in front of the Stop step 7.
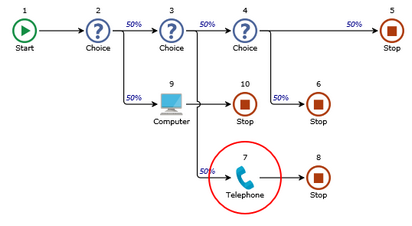
Notice that the branch with a Telephone must be placed one row below and this creates a free cell in front of step 6 where the branch with Computer can fit. So this branch is moved up because the heuristic algorithm tries to fill gaps. However, if we now delete the Telephone step the heuristic algorithm cannot move its branch up because the former place is occupied. Thus, inserting and then deleting the same step does not necessarily lead to the same result. You have to undo the insert operation to really go back to the initial situation.
The fact that not automatic arrangement is used has also an impact on the Input/Output show/hide functionality. If you press the Input/Output button in the Show/hide group on the Layout tab the automatic arrangement will spread vertically the diagram adding half of the row on top and one extra row between each two rows of the diagram to make place for the input/output balloons.
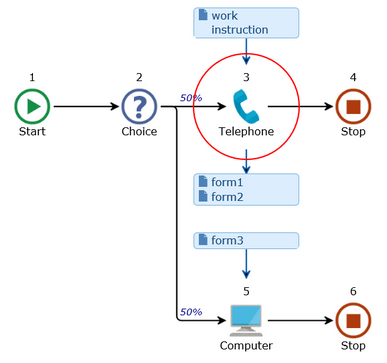
If positions of steps where changed by the user the diagram is not spread anymore, only half of a row is added on top. There is now the responsibility of the user to rearrange the steps in such a way that the input/output balloons nicely fit.
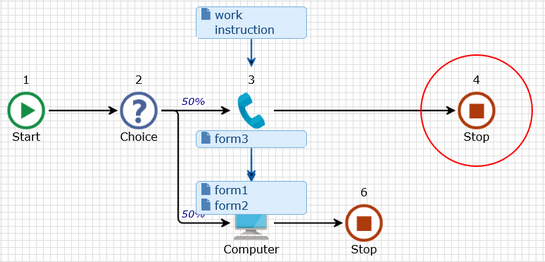
Notice that now the input to Computer is above the output from Telephone! In order to fix this the user has to move the lower branch down himself.
Moving a step or selection of steps:
You can move the selected set of steps to another place of the grid if:
| • | The new place does not contain any other steps (except the ones that are also moved). |
| • | The new place does not exceed the upper or the left border of the diagram. |
| • | The moved steps belonging to a phase do not go outside the borders of this phase. |
| • | In the Swimlane view, the steps assigned to a given role are not moved outside a lane of that role. |
The rearrangement can be done in one of the following ways. Just select the steps you want to move and:
| • | click one of the green arrows in the Move group of the Design tab. This operation is moving the selected steps one cell at a time. So it cannot be used if the steps are surrounded by other steps. |
| • | drag the selected steps and drop them in the new position. |
| • | use one of the block operations if applicable. |
Rearranging steps in swim lane view is limited. You can only move one step at a time.
Once a selection is dropped on a new place, all connecting arrows are automatically adjusted so that the order of steps in the process flow remains unchanged. The user can later reshape these arrows himself.
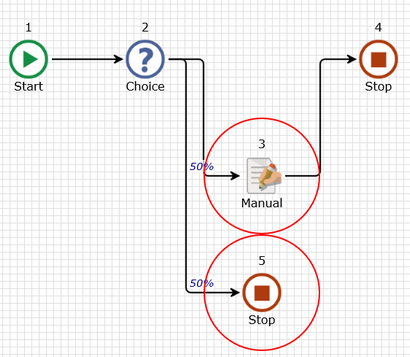
Notice that the Manual step in the example above was moved one row down onto the place that was originally occupied by Stop step. This was possible because that step was also moved one row down in the same action.
Block Operations:
The block operations are available in the Move block group of the Design tab. They are only available if exactly one step is selected:
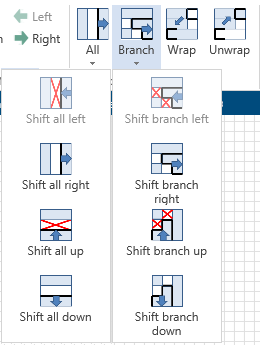
Each such an operation is using the current step selection to decide what part of the diagram is to be moved. For example, the Shift all down operation is taking into account the row of the selected step and starting from this row moves everything below one row down creating in this way an empty row above the selection.
The following table summarizes the block operations.
Not all block operations are always possible. For example, you cannot Shift all up if the row just above the selection is not empty. Some movements in swim lanes are not possible either. The Restrictions column specifies these limitations.
|
Operation |
Opposite operation |
Description |
Restrictions |
|
Shift all right |
Shift all left |
Moves all columns one cell to the right starting from the selected one. |
|
|
Shift all left |
Shift all right |
Moves all columns one cell to the left starting from the selected one. |
There must be an empty column on the left. |
|
Shift all up |
Shift all down |
Moves all rows one cell up starting from the selected one. |
There must be an empty row above. |
|
Shift all down |
Shift all up |
Moves all rows one cell down starting from the selected one. |
|
|
Shift branch right |
Shift branch left |
Moves the whole subtree starting from the selected step one cell to the right. |
There must be an empty cell on the right hand side of each step in the subtree. |
|
Shift branch left |
Shift branch right |
Moves the whole subtree starting from the selected step one cell to the left. |
There must be an empty cell on the left hand side of each step in the subtree. |
|
Shift branch up |
Shift branch down |
Moves the whole subtree starting from the selected step one cell up. |
There must be an empty cell above each step in the subtree. Not possible in swim lanes |
|
Shift branch down |
Shift branch up |
Moves the whole subtree starting from the selected step one cell down. |
There must be an empty cell below each step in the subtree. Not possible in swim lanes |
|
Wrap |
Unwrap |
Moves all steps that are in and below the selected row and in and to the right of the selected column to the bottom left of the diagram |
Not possible in swim lanes. |
|
Unwrap |
Wrap |
Moves all steps that are in and below the selected row and in and to the right of the selected column to the top right of the diagram |
Not possible in swim lanes. |
Note: Wrap and Unwrap are opposite to one another only if they start from the most left column or from the top row, respectively.